基本から高度なカスタマイズまで日本語で解説

ページビュー順に人気記事を表示してくれるWordPress Popular Posts。
手軽で細かな調整もできるので利用している方も多いと思います。
その人気からフィードバックも多いようで、細かなバージョンアップを繰り返しています。それは利用者としてありがたいのですが、バージョンアップごとに大幅に設定方法が変更になるため「更新したら表示されなくなった」ということもしばしば。
2系から3系へのアップデートで大幅に仕様が変更になったので「そろそろここらで使い方をまとめとこう」という記事です。
基本的な使い方から、高度なカスタマイズ方法まで解説しています。
WordPress Popular Postsの使い方
基本的な使い方は「GitHubのwikiページ」に簡単にまとめられています。
以下の3つの使い方が基本になります。
ウィジェットで使う方法
サイドバーで人気記事を表示するにはこの方法が一番手軽です。
「外観 > ウィジェット」で「WordPress Popular Posts」を追加。
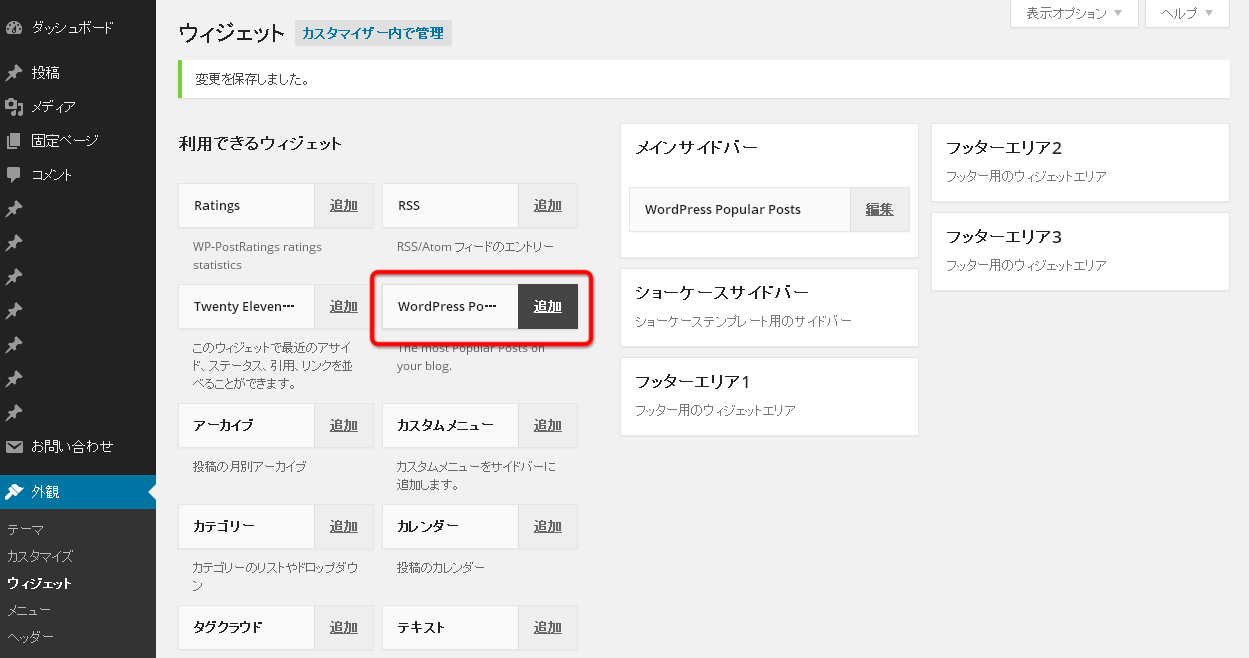
「編集」ボタンをクリックすると設定画面が出るので設定を行います。
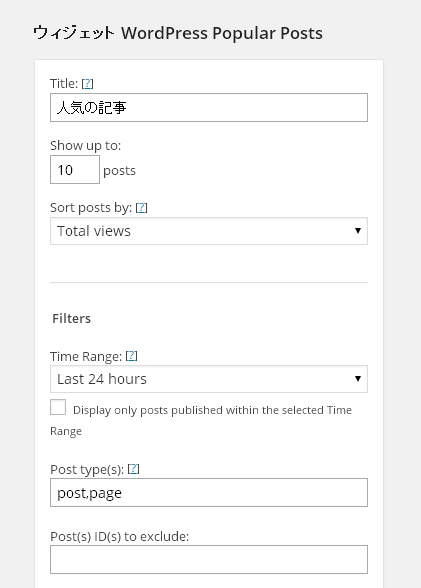
設定はそれぞれ以下の意味になります。
注意点があり、サブメニューは一旦有効にした後に再度設定画面を開くことで表示されます。
| Title | 人気記事一覧のタイトル |
|---|---|
| Show up to | 表示する投稿数(初期設定:10) |
| Sort posts by | 何を基準に順位付けするか(初期設定:ページビュー) |
| Filters | |
| Time Range | 集計期間(初期設定:24時間) |
| Post type(s) | 集計する投稿のタイプ(初期設定:post,page) |
| Post(s) ID(s) to exclude | 除外するポストID |
| Category(ies) ID(s) | 除外するカテゴリ |
| Author(s) ID(s) | 除外する投稿者 |
| Posts settings | |
| Display post rating | レーティングを表示(WP-PostRatings pluginのインストールが必要) |
| Shorten title | タイトルの文字数を指定した数で丸める。 |
| Display post excerpt | 記事の要約を表示。 |
| Display post thumbnail | サムネイルを表示。 |
| Stats Tag settings | |
| Display comment count | コメント数を表示する |
| Display views | ページビュー数を表示する |
| Display author | 投稿者を表示する |
| Display date | 投稿日時を表示する |
| Display category | カテゴリーを表示する |
| HTML Markup settings | |
| Before / after title | タイトルの前後に追加するタグの指定 |
| Before / after Popular Posts | 人気記事全体の前後に追加するタグの指定 |
| Post HTML Markup | 表示される人気記事自体の指定 |
これだけ拡張性があると一般的な用途で困ることはないと思います。
(反面、こうした拡張の結果、バージョンアップで互換性がなくなるという負の一面もあります。)
ショートコードを使う場合
投稿に追加するには以下のショートコードを記述するだけです。
デフォルトでは「投稿(post)」のうち、ページビューが多い投稿を最大で10件表示します。
※カギカッコとwppの間にスペースがありますが、実際使用する際は削除してください。ショートコードを投稿画面に書くと実行されてしまうので、対策としてスペースを入れています。
[ wpp ]
カスタマイズも簡単です。
例)一週間でページビューが多い順に表示。ページビュー数も表示。
[ wpp range=weekly stats_views=1 order_by=views ]
テンプレートに記述する場合
一番細かく制御できる方法です。
ただ「投稿(post)」を表示するだけならテンプレートに以下のように追加するだけです。
if (function_exists('wpp_get_mostpopular')) {
	wpp_get_mostpopular();
}
function_existsでプラグインの存在を調べて実行しているだけですね。
こちらも同じように細かなカスタマイズができます。
例)一週間でページビューが多い順に最大で7件表示。
if (function_exists('wpp_get_mostpopular')) {
	wpp_get_mostpopular("range=weekly&limit=7");
}
以前は複数の引数を&で繋いで1行で指定しているサンプルが多かったですが、見通しが悪くなるので以下のように配列で指定したほうが現実的です。
post_typeの部分を見ていただけば分かる通り、カスタム投稿タイプもサポートしています。
if (function_exists('wpp_get_mostpopular')) {
	$arg = array (
		'range' => 'weekly',//集計する期間
		'order_by' => 'views',//閲覧数で集計
		'post_type' => 'post,page',//ポストタイプを指定
		'title_length' => '25',//表示させるタイトル文字数
		'limit' => 10, //表示数
	);
	wpp_get_mostpopular($arg);
}
フックを利用した高度なカスタマイズ
WordPress Popular Postsではフィルターフックを利用したカスタマイズも用意されています。
Githubの解説ページ。
用意されているフックは2つ。
wpp_custom_htmlについて
wpp_custom_htmlには2つの関数があります。
get_excerpt_by_idは抜粋を表示するための関数です。
/*
 * Gets the excerpt using the post ID outside the loop.
 *
 * @author      Withers David
 * @link        http://uplifted.net/programming/wordpress-get-the-excerpt-automatically-using-the-post-id-outside-of-the-loop/
 * @param       int $post_id
 * @return      string
 */
function get_excerpt_by_id($post_id){
    $the_post = get_post($post_id); //Gets post ID
    $the_excerpt = $the_post->post_content; //Gets post_content to be used as a basis for the excerpt
    $excerpt_length = 35; //Sets excerpt length by word count
    $the_excerpt = strip_tags(strip_shortcodes($the_excerpt)); //Strips tags and images
    $words = explode(' ', $the_excerpt, $excerpt_length + 1);

    if (count($words) > $excerpt_length) :
        array_pop($words);
        array_push($words, '...');
        $the_excerpt = implode(' ', $words);
    endif;

    $the_excerpt = '<p>' . $the_excerpt . '</p>';
    return $the_excerpt;
}
抜粋する文字数や書き出すタグ<p>など簡単に変更できます。
もう1つのmy_custom_popular_posts_html_listは投稿をリスト表示する際の全体のhtmlに関する関数です。
/*
 * Builds custom HTML
 *
 * With this function, I can alter WPP's HTML output from my theme's functions.php.
 * This way, the modification is permanent even if the plugin gets updated.
 *
 * @param   array   $mostpopular
 * @param   array   $instance
 * @return  string
 */
function my_custom_popular_posts_html_list( $mostpopular, $instance ){
    $output = '<ol class="wpp-list">';

    // loop the array of popular posts objects
    foreach( $mostpopular as $popular ) {

        $stats = array(); // placeholder for the stats tag

        // Comment count option active, display comments
        if ( $instance['stats_tag']['comment_count'] ) {
            // display text in singular or plural, according to comments count
            $stats[] = '<span class="wpp-comments">' . sprintf(
                _n('1 comment', '%s comments', $popular->comment_count, 'wordpress-popular-posts'),
                number_format_i18n($popular->comment_count)
            ) . '</span>';
        }

        // Pageviews option checked, display views
        if ( $instance['stats_tag']['views'] ) {

            // If sorting posts by average views
            if ($instance['order_by'] == 'avg') {
                // display text in singular or plural, according to views count
                $stats[] = '<span class="wpp-views">' . sprintf(
                    _n('1 view per day', '%s views per day', intval($popular->pageviews), 'wordpress-popular-posts'),
                    number_format_i18n($popular->pageviews, 2)
                ) . '</span>';
            } else { // Sorting posts by views
                // display text in singular or plural, according to views count
                $stats[] = '<span class="wpp-views">' . sprintf(
                    _n('1 view', '%s views', intval($popular->pageviews), 'wordpress-popular-posts'),
                    number_format_i18n($popular->pageviews)
                ) . '</span>';
            }
        }

        // Author option checked
        if ($instance['stats_tag']['author']) {
            $author = get_the_author_meta('display_name', $popular->uid);
            $display_name = '<a href="' . get_author_posts_url($popular->uid) . '">' . $author . '</a>';
            $stats[] = '<span class="wpp-author">' . sprintf(__('by %s', 'wordpress-popular-posts'), $display_name). '</span>';
        }

        // Date option checked
        if ($instance['stats_tag']['date']['active']) {
            $date = date_i18n($instance['stats_tag']['date']['format'], strtotime($popular->date));
            $stats[] = '<span class="wpp-date">' . sprintf(__('posted on %s', 'wordpress-popular-posts'), $date) . '</span>';
        }

        // Category option checked
        if ($instance['stats_tag']['category']) {
            $post_cat = get_the_category($popular->id);
            $post_cat = (isset($post_cat[0]))
              ? '<a href="' . get_category_link($post_cat[0]->term_id) . '">' . $post_cat[0]->cat_name . '</a>'
              : '';

            if ($post_cat != '') {
                $stats[] = '<span class="wpp-category">' . sprintf(__('under %s', 'wordpress-popular-posts'), $post_cat) . '</span>';
            }
        }

        // Build stats tag
        if ( !empty($stats) ) {
            $stats = '<div class="wpp-stats">' . join( ' | ', $stats ) . '</div>';
        }

        $excerpt = ''; // Excerpt placeholder

        // Excerpt option checked, build excerpt tag
        if ($instance['post-excerpt']['active']) {

            $excerpt = get_excerpt_by_id( $popular->id );
            if ( !empty($excerpt) ) {
                $excerpt = '<div class="wpp-excerpt">' . $excerpt . '</div>';
            }

        }

        $output .= "<li>";
        $output .= "<h2 class=\"entry-title\"><a href=\"" . get_the_permalink( $popular->id ) . "\" title=\"" . esc_attr( $popular->title ) . "\">" . $popular->title . "</a></h2>";
        $output .= $stats;
        $output .= $excerpt;
        $output .= "</li>" . "\n";

    }

    $output .= '</ol>';

    return $output;
}

add_filter( 'wpp_custom_html', 'my_custom_popular_posts_html_list', 10, 2 );
この例ではタイトルがh2でページビュー数を表示しています。
それぞれのオプションに関する細かなタグの指定もできます。
wpp_postについて
wpp_postは全体の表示ではなく、投稿個別の表示に関する関数です。
/*
 * Display the title and the publish date
 */
function my_custom_single_popular_post( $post_html, $p, $instance ){
    $output = '<li><a href="' . get_the_permalink($p->id) . '" class="my-custom-title-class" title="' . esc_attr($p->title) . '">' . $p->title . '</a> <div class="my-custom-date-class">' . date( 'Y-m-d', strtotime($p->date) ) . '</div></li>';
    return $output;
}
add_filter( 'wpp_post', 'my_custom_single_popular_post', 10, 3 );
この例では投稿日時を取得して表示しています。
例えば「自分で追加したカスタムフィールドの値を追加したい」といった場合はfunctions.phpに以下のように追加します。
/*
 * Display the title and the publish date
 */
function my_custom_single_popular_post( $post_html, $p, $instance ){

	$custom_hoge = get_post_meta($p->id, 'hoge', true);
    $output = '<li><a href="' . get_the_permalink($p->id) . '" class="my-custom-title-class" title="' . $p->title . '">' . $custom_hoge . $p->title  . '</a></li>';
    return $output;
}
add_filter( 'wpp_post', 'my_custom_single_popular_post', 10, 3 );
get_post_metaに$p->idで投稿のIDを渡して、カスタムフィールドのキーがhoge、第3引数にtrueを指定したので文字列として取得しています。
後はreturnで返り値に指定すればカスタマイズ完了です。
応用すればカスタムフィールドに画像のURLがある場合に表示したり、特定のフラグで分類することも可能です。
以上のようにリスト表示全体の変更はwpp_custom_html。個別の表示の変更はwpp_postを使ってフックすることで自由に変更することができます。
2つのフックを組み合わせれば実質どんな表示でも可能です。
おさらいとして、WordPress Popular Posts 3.2.1は以下の使用方法がありました。
- 1.ウィジェットを利用した方法。
- 2.ショートコード、もしくはテンプレートタグを使用した方法。
- 3.function.phpでwpp_custom_htmlもしくはwpp_postを利用してフックする方法。
上から順番に設定方法は複雑になりますが、自由度も高くなります。
サイトに合わせてカスタマイズしてみてください。
個人的には機能は十分なので、バージョンアップのたびに関数や引数が変更になって動作しなくなるというようなことは止めていただきたいですw
 WordPressに人気の記事を表示するPopular Postsの導入方法
 Popular Postsをカスタマイズして、人気記事のサムネイルを表示する方法
 WordPress Popular Postsでページビューがカウントされない場合に試す4つのこと
 もう覚えなくても大丈夫!?WordPressの条件分岐タグの使い方まとめ
 WordPressのコメント欄に追加された「次回のコメントで使用するため…」を削除する方法
 WordPressのテンプレートタグを使ってコメントフォームをカスタマイズする方法