いつも通りにコンパイルしたところエラーが発生
Nginxをインストールする際、リバースプロキシのキャッシュを削除するためにngx_cache_purgeモジュールを組み込んでソースからコンパイルする方も多いと思います。
今回CentOS6でいつも通りにコンパイルしたところエラーが出てハマったので、導入方法と合わせて原因と解決方法を解説します。
各種ファイルのダウンロードとspecファイルの変種
CentOS6用のソースファイルをダウンロード
まずはエンタープライズLinux用の拡張パッケージ(EPEL)からソースファイルをダウンロードします。
http://dl.fedoraproject.org/pub/epel/6/SRPMS/から当該ファイルを調べることができます。今回は最新版が「nginx-1.0.15-11.el6.src.rpm」だったので以下の通り。
# su - hoge ← hogeユーザーで実行する場合
$ wget http://dl.fedoraproject.org/pub/epel/6/SRPMS/nginx-1.0.15-11.el6.src.rpm
ちなみにビルド作業用のユーザーを「mockbuild」とする例が多いですが、一般ユーザーで既にhomeディレクトリのあるユーザーであればユーザー名は何でも構いません。
ソースファイルのインストール
$ rpm -ivh nginx-1.0.15-11.el6.src.rpm
ngx_cache_purgeをダウンロード
ダウンロードするファイルはhttp://labs.frickle.com/files/から調べることができる。
$ cd ~/rpmbuild/SOURCES/ ← ソースを展開するディレクトリに移動
$ wget http://labs.frickle.com/files/ngx_cache_purge-2.3.tar.gz
Nginxをダウンロード
ダウンロードするファイルはhttp://nginx.org/en/download.htmlで調べられる。
Stable versionとMainline versionについて

Stable versionが安定版、Mainline versionが通常版となっている。
Stable versionはAPIとの互換性を重視したり、こなれたものを好む環境向け。
Mainline versionは開発版という扱いではなく、名前の通りこちらが通常版で特別な理由が無い限りこちらを使う。バグの修正もMainlineが先で、その後に重大なエラーの場合はStableにも反映されるという流れらしい。

参考:どのバージョンのnginxを使うべきか? - 考える人、コードを書く人より
今回はさくっと作業を終えたいのでStable versionの1.6.2を選択。
$ wget http://nginx.org/download/nginx-1.6.2.tar.gz
specファイルの編集
specファイルはRPMファイルを作るための手順書のようなものです。
一応初めて触れる方にもわかるように解説を加えながら進めます。
さらに詳しく知りたい方は英語版ですがFedoraのwikiで詳しく解説されています。
https://fedoraproject.org/wiki/How_to_create_an_RPM_package
もしくはこちら。
http://vinelinux.org/docs/vine6/making-rpm/make-spec.html
$ cd ~/rpmbuild/SPECS  ← specファイルのディレクトリに移動
$ cp nginx.spec nginx.spec.org  ← バックアップ
$ vi nginx.spec
1.マクロの定義を追加
「%define」はマクロの定義で、「%define マクロの名前 内容」という書式で書きます。
使いたい場合は「%{マクロの名前}」とすれば表示できます。
下の例で言えば「%{ngx_cache_purge_version}」と書けば「2.3」が返ります。
「_unpackaged_files_terminate_build 0」はファイルの定義をするものです。
RPMは%filesセクションに記載されていないファイルをパッケージのリストに見つけた場合に強制終了します。
この仕組みによってspecファイルが正確に記述されているか判定できるものの、今回のように自分でモジュールなどを追加した場合はオフにしておいたほうが良いようです。ちなみに今回は無くても問題なくコンパイルできましたが、書式のようなものとして追加しておいてください。
ドキュメントエラーの場合は「%define _missing_doc_files_terminate_build 0」を使います。
%define _unpackaged_files_terminate_build 0
%define ngx_cache_purge_version 2.3
2.バージョンの指定
11行目あたり、Nginxのバージョンとリリース番号、ディストリビューションを指定します。再度モジュール等を追加してコンパイルし直す場合はリリース番号を更新してください。
Version:           1.0.15
Release:           11%{?dist}
↓
Version:           1.6.2
Release:           1%{?dist}
3.ngx_cache_purgeのソースを追加
28行目あたり、ソースの後の番号は空いてるものならなんでもいいですが、切り良く「10」にしときます。上で解説したように%{ngx_cache_purge_version}は2.3が渡されます。
Source7:           nginx.sysconfig
↓
Source7:           nginx.sysconfig
Source10: ngx_cache_purge-%{ngx_cache_purge_version}.tar.gz
4.nginx-auto-cc-gccパッチをコメントアウト
90行目あたり、パッチの適用をコメントアウト。
patch0は設定ファイルで定義したように「nginx-auto-cc-gcc.patch」というパッチで、バッファが溢れるのを防ぐFORTIFY_SOURCE=2がFedora系ではコンパイルエラーになるため無効にするためのパッチです。
CentOS6ではこのパッチを当てずともコンパイルできるのでコメントアウトして無効にします。
%patch0 -p0
↓
#%patch0 -p0
続いて今回コンパイルエラーの原因になった「patch1」もコメントアウトします。
こちらは「nginx-1.0.15-fix-CVE-2014-3616.patch」というパッチ。バーチャルドメインで複数のサイトを運営している場合、SSLのキーやキャッシュを共通して利用してしまうバグを修正するもの。クッキーの盗難やセッションハイジャックに悪用されることがあるようです。
詳しくはBug 1142573 – CVE-2014-3616 nginx: virtual host confusion。
上記のサイトに解説されているようにStable versionなら1.6.2以上、Mainline versionなら1.7.5 以上で解決されているとのこと。
つまり今回インストールする1.6.2ならパッチは必要ないのでコメントアウトします。
%patch1 -p1
↓
#%patch1 -p1
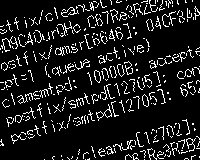
ちなみにコメントアウトせずにコンパイルしようとすると以下のエラーが出ます。
+ echo 'Patch #1 (nginx-1.0.15-fix-CVE-2014-3616.patch):'
Patch #1 (nginx-1.0.15-fix-CVE-2014-3616.patch):
+ /bin/cat /home/www/rpmbuild/SOURCES/nginx-1.0.15-fix-CVE-2014-3616.patch
+ /usr/bin/patch -p1 --fuzz=0
patching file src/event/ngx_event_openssl.c
Hunk #1 FAILED at 1498.
1 out of 1 hunk FAILED -- saving rejects to file src/event/ngx_event_openssl.c.rej
error: Bad exit status from /var/tmp/rpm-tmp.OTT0Zs (%prep)
試しにNginx 1.6.2で「~/rpmbuild/BUILD」に展開された「src/event/ngx_event_openssl.c」を見てみてもパッチの当該箇所がありません。
さらに1.6.1を見てみるとパッチの当該箇所はあるものの、パッチのミスなのか、そもそも対象となるバージョンが異なっているのか不明ですが行数の指定が間違っており、やはりエラーになります。
何らかの理由で1.6.1以下を使う場合は上記パッチを手動で当てる必要がありそうです。
5.ngx_cache_purgeのソースファイル用の設定を追加
93行目あたり、ソースファイルの展開方法を指定します。ざっくり解説するとnginx.sysconfigを展開した場所にファイルを展開して削除をしないという設定です。
セットアップマクロについては「%setupマクロの詳細」で詳しく解説されています。
必要な方は参照してください。
%patch2 -p0
↓
%patch2 -p0
%setup -T -D -a 10
6.言語設定を追加
export DESTDIR=%{buildroot}
↓
export LANG='ja_JP.UTF-8'
export DESTDIR=%{buildroot}
7.オプションにngx_cache_purgeを追加
--with-cc-opt="%{optflags} $(pcre-config --cflags)" \
↓
--with-cc-opt="%{optflags} $(pcre-config --cflags)" \
--add-module=%{_builddir}/nginx-%{version}/ngx_cache_purge-%{ngx_cache_purge_version} \
8.ngx_cache_purgeのリードミーと更新ログをリネーム
make %{?_smp_mflags}
↓
make %{?_smp_mflags}

mv ngx_cache_purge-%{ngx_cache_purge_version}/CHANGES ngx_cache_purge-%{ngx_cache_purge_version}/CHANGES.ngx_cache_purge
mv ngx_cache_purge-%{ngx_cache_purge_version}/README.md ngx_cache_purge-%{ngx_cache_purge_version}/README.ngx_cache_purge
9.ngx_cache_purgeのドキュメントファイルの指定
%doc LICENSE CHANGES README
↓
%doc LICENSE CHANGES README
%doc ngx_cache_purge-%{ngx_cache_purge_version}/CHANGES.ngx_cache_purge ngx_cache_purge-%{ngx_cache_purge_version}/README.ngx_cache_purge
以上で全ての設定は完了です。
バージョンごとに細かく異なるので、設定を理解して自分で修正したほうがいいですが、一応今回の修正したspecファイルを掲載します。
%define _unpackaged_files_terminate_build 0
%define ngx_cache_purge_version 2.3
%global  nginx_user          nginx
%global  nginx_group         %{nginx_user}
%global  nginx_home          %{_localstatedir}/lib/nginx
%global  nginx_home_tmp      %{nginx_home}/tmp
%global  nginx_logdir        %{_localstatedir}/log/nginx
%global  nginx_confdir       %{_sysconfdir}/nginx
%global  nginx_datadir       %{_datadir}/nginx
%global  nginx_webroot       %{nginx_datadir}/html

Name:              nginx
Version:           1.6.2
Release:           1%{?dist}

Summary:           A high performance web server and reverse proxy server
Group:             System Environment/Daemons
# BSD License (two clause)
# http://www.freebsd.org/copyright/freebsd-license.html
License:           BSD
URL:               http://nginx.org/

Source0:           http://nginx.org/download/nginx-%{version}.tar.gz
Source1:           nginx.init
Source2:           nginx.logrotate
Source3:           nginx.conf
Source4:           default.conf
Source5:           ssl.conf
Source6:           virtual.conf
Source7:           nginx.sysconfig
Source10: ngx_cache_purge-%{ngx_cache_purge_version}.tar.gz
Source100:         index.html
Source101:         poweredby.png
Source102:         nginx-logo.png
Source103:         404.html
Source104:         50x.html
Source200:         vim-ftdetect.vim
Source201:         vim-indent.vim
Source202:         vim-syntax.vim

# removes -Werror in upstream build scripts.  -Werror conflicts with
# -D_FORTIFY_SOURCE=2 causing warnings to turn into errors.
Patch0:            nginx-auto-cc-gcc.patch

# Patch for CVE-2014-3616 virtual host confusion.
Patch1:            nginx-1.0.15-fix-CVE-2014-3616.patch

# Patch for CVE-2013-4547 security bypass due to whitespace parsing.
Patch2:            nginx-1.0.15-fix-CVE-2013-4547.patch

BuildRequires:     GeoIP-devel
BuildRequires:     gd-devel
BuildRequires:     libxslt-devel
BuildRequires:     openssl-devel
BuildRequires:     pcre-devel
BuildRequires:     perl-devel
BuildRequires:     perl(ExtUtils::Embed)
BuildRequires:     zlib-devel

Requires:          nginx-filesystem = %{version}-%{release}
Requires:          GeoIP
Requires:          gd
Requires:          openssl
Requires:          pcre
Requires:          perl(:MODULE_COMPAT_%(eval "`%{__perl} -V:version`"; echo $version))
Requires(pre):     nginx-filesystem
Requires(post):    chkconfig
Requires(preun):   chkconfig, initscripts
Requires(postun):  initscripts
Provides:          webserver

%description
Nginx is a web server and a reverse proxy server for HTTP, SMTP, POP3 and
IMAP protocols, with a strong focus on high concurrency, performance and low
memory usage.

%package filesystem
Group:             System Environment/Daemons
Summary:           The basic directory layout for the Nginx server
BuildArch:         noarch
Requires(pre):     shadow-utils

%description filesystem
The nginx-filesystem package contains the basic directory layout
for the Nginx server including the correct permissions for the
directories.

%prep
%setup -q
#%patch0 -p0
#%patch1 -p1
%patch2 -p0
%setup -T -D -a 10

%build
# nginx does not utilize a standard configure script.  It has its own
# and the standard configure options cause the nginx configure script
# to error out.  This is is also the reason for the DESTDIR environment
# variable.
export LANG='ja_JP.UTF-8'
export DESTDIR=%{buildroot}
./configure \
    --prefix=%{nginx_datadir} \
    --sbin-path=%{_sbindir}/nginx \
    --conf-path=%{nginx_confdir}/nginx.conf \
    --error-log-path=%{nginx_logdir}/error.log \
    --http-log-path=%{nginx_logdir}/access.log \
    --http-client-body-temp-path=%{nginx_home_tmp}/client_body \
    --http-proxy-temp-path=%{nginx_home_tmp}/proxy \
    --http-fastcgi-temp-path=%{nginx_home_tmp}/fastcgi \
    --http-uwsgi-temp-path=%{nginx_home_tmp}/uwsgi \
    --http-scgi-temp-path=%{nginx_home_tmp}/scgi \
    --pid-path=%{_localstatedir}/run/nginx.pid \
    --lock-path=%{_localstatedir}/lock/subsys/nginx \
    --user=%{nginx_user} \
    --group=%{nginx_group} \
    --with-file-aio \
    --with-ipv6 \
    --with-http_ssl_module \
    --with-http_realip_module \
    --with-http_addition_module \
    --with-http_xslt_module \
    --with-http_image_filter_module \
    --with-http_geoip_module \
    --with-http_sub_module \
    --with-http_dav_module \
    --with-http_flv_module \
    --with-http_mp4_module \
    --with-http_gzip_static_module \
    --with-http_random_index_module \
    --with-http_secure_link_module \
    --with-http_degradation_module \
    --with-http_stub_status_module \
    --with-http_perl_module \
    --with-mail \
    --with-mail_ssl_module \
    --with-debug \
--with-cc-opt="%{optflags} $(pcre-config --cflags)" \
--add-module=%{_builddir}/nginx-%{version}/ngx_cache_purge-%{ngx_cache_purge_version} \
    --with-ld-opt="-Wl,-E" # so the perl module finds its symbols

make %{?_smp_mflags}

mv ngx_cache_purge-%{ngx_cache_purge_version}/CHANGES ngx_cache_purge-%{ngx_cache_purge_version}/CHANGES.ngx_cache_purge
mv ngx_cache_purge-%{ngx_cache_purge_version}/README.md ngx_cache_purge-%{ngx_cache_purge_version}/README.ngx_cache_purge

%install
make install DESTDIR=%{buildroot} INSTALLDIRS=vendor

find %{buildroot} -type f -name .packlist -exec rm -f '{}' \;
find %{buildroot} -type f -name perllocal.pod -exec rm -f '{}' \;
find %{buildroot} -type f -empty -exec rm -f '{}' \;
find %{buildroot} -type f -iname '*.so' -exec chmod 0755 '{}' \;

install -p -D -m 0755 %{SOURCE1} \
    %{buildroot}%{_initrddir}/nginx
install -p -D -m 0644 %{SOURCE2} \
    %{buildroot}%{_sysconfdir}/logrotate.d/nginx
install -p -D -m 0644 %{SOURCE7} \
    %{buildroot}%{_sysconfdir}/sysconfig/nginx

install -p -d -m 0755 %{buildroot}%{nginx_confdir}/conf.d
install -p -d -m 0755 %{buildroot}%{nginx_confdir}/default.d
install -p -d -m 0700 %{buildroot}%{nginx_home}
install -p -d -m 0700 %{buildroot}%{nginx_home_tmp}
install -p -d -m 0700 %{buildroot}%{nginx_logdir}
install -p -d -m 0755 %{buildroot}%{nginx_webroot}

install -p -m 0644 %{SOURCE3} \
    %{buildroot}%{nginx_confdir}
install -p -m 0644 %{SOURCE4} %{SOURCE5} %{SOURCE6} \
    %{buildroot}%{nginx_confdir}/conf.d
install -p -m 0644 %{SOURCE100} \
    %{buildroot}%{nginx_webroot}
install -p -m 0644 %{SOURCE101} %{SOURCE102} \
    %{buildroot}%{nginx_webroot}
install -p -m 0644 %{SOURCE103} %{SOURCE104} \
    %{buildroot}%{nginx_webroot}

install -p -D -m 0644 %{_builddir}/nginx-%{version}/man/nginx.8 \
    %{buildroot}%{_mandir}/man8/nginx.8

install -p -D -m644 %{SOURCE200} \
    %{buildroot}%{_datadir}/vim/vimfiles/ftdetect/nginx.vim
install -p -D -m644 %{SOURCE201} \
    %{buildroot}%{_datadir}/vim/vimfiles/indent/nginx.vim
install -p -D -m644 %{SOURCE202} \
    %{buildroot}%{_datadir}/vim/vimfiles/syntax/nginx.vim


%pre
getent group %{nginx_group} > /dev/null || groupadd -r %{nginx_group}
getent passwd %{nginx_user} > /dev/null || \
    useradd -r -d %{nginx_home} -g %{nginx_group} \
    -s /sbin/nologin -c "Nginx web server" %{nginx_user}
exit 0

%post
if [ $1 -eq 1 ]; then
    /sbin/chkconfig --add %{name}
fi
if [ $1 -eq 2 ]; then
    # Make sure these directories are not world readable.
    chmod 700 %{nginx_home}
    chmod 700 %{nginx_home_tmp}
    chmod 700 %{nginx_logdir}
fi

%preun
if [ $1 -eq 0 ]; then
    /sbin/service %{name} stop >/dev/null 2>&1
    /sbin/chkconfig --del %{name}
fi

%postun
if [ $1 -eq 2 ]; then
    /sbin/service %{name} upgrade || :
fi

%files
%doc LICENSE CHANGES README
%doc ngx_cache_purge-%{ngx_cache_purge_version}/CHANGES.ngx_cache_purge ngx_cache_purge-%{ngx_cache_purge_version}/README.ngx_cache_purge
%{nginx_datadir}/html/*
%{_sbindir}/nginx
%{_datadir}/vim/vimfiles/ftdetect/nginx.vim
%{_datadir}/vim/vimfiles/syntax/nginx.vim
%{_datadir}/vim/vimfiles/indent/nginx.vim
%{_mandir}/man3/nginx.3pm*
%{_mandir}/man8/nginx.8*
%{_initrddir}/nginx
%dir %{nginx_confdir}
%dir %{nginx_confdir}/conf.d
%config(noreplace) %{nginx_confdir}/fastcgi.conf
%config(noreplace) %{nginx_confdir}/fastcgi.conf.default
%config(noreplace) %{nginx_confdir}/fastcgi_params
%config(noreplace) %{nginx_confdir}/fastcgi_params.default
%config(noreplace) %{nginx_confdir}/koi-utf
%config(noreplace) %{nginx_confdir}/koi-win
%config(noreplace) %{nginx_confdir}/mime.types
%config(noreplace) %{nginx_confdir}/mime.types.default
%config(noreplace) %{nginx_confdir}/nginx.conf
%config(noreplace) %{nginx_confdir}/nginx.conf.default
%config(noreplace) %{nginx_confdir}/scgi_params
%config(noreplace) %{nginx_confdir}/scgi_params.default
%config(noreplace) %{nginx_confdir}/uwsgi_params
%config(noreplace) %{nginx_confdir}/uwsgi_params.default
%config(noreplace) %{nginx_confdir}/win-utf
%config(noreplace) %{nginx_confdir}/conf.d/*.conf
%config(noreplace) %{_sysconfdir}/logrotate.d/nginx
%config(noreplace) %{_sysconfdir}/sysconfig/nginx
%dir %{perl_vendorarch}/auto/nginx
%{perl_vendorarch}/nginx.pm
%{perl_vendorarch}/auto/nginx/nginx.so
%attr(700,%{nginx_user},%{nginx_group}) %dir %{nginx_home}
%attr(700,%{nginx_user},%{nginx_group}) %dir %{nginx_home_tmp}
%attr(700,%{nginx_user},%{nginx_group}) %dir %{nginx_logdir}

%files filesystem
%dir %{nginx_datadir}
%dir %{nginx_datadir}/html
%dir %{nginx_confdir}
%dir %{nginx_confdir}/conf.d
%dir %{nginx_confdir}/default.d

%changelog
* Tue Nov 11 2014 Jamie Nguyen <jamielinux@fedoraproject.org> - 1.0.15-11
- fix CVE-2013-4547 security bypass due to whitespace parsing
  (#1032266, #1032270)

* Wed Oct 22 2014 Jamie Nguyen <jamielinux@fedoraproject.org> - 1.0.15-10
- add vim files (#1142849)

* Wed Oct 22 2014 Jamie Nguyen <jamielinux@fedoraproject.org> - 1.0.15-9
- use default.d directory

* Wed Oct 08 2014 Jamie Nguyen <jamielinux@fedoraproject.org> - 1.0.15-8
- fix typo in Requires

* Mon Sep 22 2014 Jamie Nguyen <jamielinux@fedoraproject.org> - 1.0.15-7
- create nginx-filesystem subpackage (patch from Remi Collet)

* Mon Sep 22 2014 Jamie Nguyen <jamielinux@fedoraproject.org> - 1.0.15-6
- fix CVE-2014-3616 virtual host confusion (#1142573, #1142576)

* Fri Apr 26 2013 Jamie Nguyen <jamielinux@fedoraproject.org> - 1.0.15-5
- enable debugging (#956845)
- trim changelog

* Fri Feb 22 2013 Jamie Nguyen <jamielinux@fedoraproject.org> - 1.0.15-4
- make sure nginx directories are not world readable (#913734, #913736)

* Sun Oct 28 2012 Jamie Nguyen <jamielinux@fedoraproject.org> - 1.0.15-3
- add nginx man page (#870738)
- link to official documentation not the community wiki (#870733)
- default.conf: add "default_server" to the "listen" directive (#842738)

* Mon May 14 2012 Jamie Nguyen <jamielinux@fedoraproject.org> - 1.0.15-2
- fix postrotate script in nginx.logrotate (#705264)

* Thu Apr 19 2012 Jamie Nguyen <jamielinux@fedoraproject.org> - 1.0.15-1
- update to upstream release 1.0.15
- CVE-2012-2089 (#812093)

* Thu Mar 15 2012 Jamie Nguyen <jamielinux@fedoraproject.org> - 1.0.14-1
- update to upstream release 1.0.14
- CVE-2012-1180 (#803856)

* Sun Mar 04 2012 Jamie Nguyen <jamielinux@fedoraproject.org> - 1.0.13-2
- remove incorrect BR

* Sat Mar 03 2012 Jamie Nguyen <jamielinux@fedoraproject.org> - 1.0.13-1
- update to upstream release 1.0.13
- general spec file cleanup to match rawhide (for easier diff), including:
- replace %%define with %%global
- amend nginx.init and nginx.conf
- amend %%pre scriptlet to match with guidelines
- remove obsolete BuildRoot tag, %%clean section and %%defattr
- remove various unnecessary commands

* Sun Feb 19 2012 Jeremy Hinegardner <jeremy at hinegardner dot org> - 1.0.12-1
- Update to 1.0.12

* Wed Dec 14 2011 Keiran "Affix" Smith <fedora@affix.me> - 1.0.10-2
- Fix Build Issue

* Thu Nov 17 2011 Keiran "Affix" Smith <fedora@affix.me> - 1.0.10-1
- Bugfix: a segmentation fault might occur in a worker process if resolver got a big DNS response. Thanks to Ben Hawkes.
- Bugfix: in cache key calculation if internal MD5 implementation wasused; the bug had appeared in 1.0.4.
- Bugfix: the module ngx_http_mp4_module sent incorrect "Content-Length" response header line if the "start" argument was used. Thanks to Piotr Sikora.

* Thu Oct 27 2011 Keiran "Affix" Smith <fedora@affix.me> - 1.0.8-1
- Update to new 1.0.8 stable release

* Fri Aug 26 2011 Keiran "Affix" Smith <fedora@affix.me> - 1.0.5-1
- Update nginx to Latest Stable Release

* Fri Jun 17 2011 Marcela Maナ。lテ。ナ・vテ。 <mmaslano@redhat.com> - 1.0.0-3
- Perl mass rebuild

* Thu Jun 09 2011 Marcela Maナ。lテ。ナ・vテ。 <mmaslano@redhat.com> - 1.0.0-2
- Perl 5.14 mass rebuild

* Wed Apr 27 2011 Jeremy Hinegardner <jeremy at hinegardner dot org> - 1.0.0-1
- Update to 1.0.0

* Tue Feb 08 2011 Fedora Release Engineering <rel-eng@lists.fedoraproject.org> - 0.8.53-6
- Rebuilt for https://fedoraproject.org/wiki/Fedora_15_Mass_Rebuild

* Sun Dec 12 2010 Jeremy Hinegardner <jeremy at hinegardner dot org> - 0.8.53.5
- Extract out default config into its own file (bug #635776)

* Sun Dec 12 2010 Jeremy Hinegardner <jeremy at hinegardner dot org> - 0.8.53-4
- Revert ownership of log dir

* Sun Dec 12 2010 Jeremy Hinegardner <jeremy at hinegardner dot org> - 0.8.53-3
- Change ownership of /var/log/nginx to be 0700 nginx:nginx
- update init script to use killproc -p
- add reopen_logs command to init script
- update init script to use nginx -q option

* Sun Oct 31 2010 Jeremy Hinegardner <jeremy at hinegardner dot org> - 0.8.53-2
- Fix linking of perl module

* Sun Oct 31 2010 Jeremy Hinegardner <jeremy at hinegardner dot org> - 0.8.53-1
- Update to new stable 0.8.53

* Sat Jul 31 2010 Jeremy Hinegardner <jeremy at hinegardner dot org> - 0.7.67-2
- add Provides: webserver (bug #619693)

* Sun Jun 20 2010 Jeremy Hinegardner <jeremy at hinegardner dot org> - 0.7.67-1
- Update to new stable 0.7.67
- fix bugzilla #591543

* Tue Jun 01 2010 Marcela Maslanova <mmaslano@redhat.com> - 0.7.65-2
- Mass rebuild with perl-5.12.0

* Mon Feb 15 2010 Jeremy Hinegardner <jeremy at hinegardner dot org> - 0.7.65-1
- Update to new stable 0.7.65
- change ownership of logdir to root:root
- add support for ipv6 (bug #561248)
- add random_index_module
- add secure_link_module

* Fri Dec 04 2009 Jeremy Hinegardner <jeremy at hinegardner dot org> - 0.7.64-1
- Update to new stable 0.7.64
Nginxをコンパイルしてインストールする
コンパイルに必要なパッケージのインストール
まずはコンパイルに必要なパッケージをインストールします。
specファイルのBuildRequiresに記載されていたものが必要なパッケージです。
# yum install GeoIP-devel gd-devel libxslt-devel openssl-devel pcre-devel perl-devel perl zlib-devel
コンパイル
コンパイルするユーザーに戻してrpmbuildでコンパイルします。
# su - hoge
$ cd ~/rpmbuild/SPECS/
$ rpmbuild -bb nginx.spec
ズラーっと表示されるが、以下のように出力されれば成功。
+ cd /home/www/rpmbuild/BUILD
+ cd nginx-1.6.2
+ /bin/rm -rf /home/www/rpmbuild/BUILDROOT/nginx-1.6.2-1.el6.x86_64
+ exit 0
あとは普通のrpmファイルと同じようにインストールするだけです。
既にNginxがインストールしてある場合はアンインストールをしてからインストールしたほうが確実です。yumで削除すると依存関係にあるソフトも削除されて面倒なので、nodepsオプションを付けてNginxだけアンインストールします。
設定ファイルはrpmが自動でバックアップを取ってくれますが、無くなると面倒なので設定ファイルは自分でバックアップしてからアンインストールしてください。
# rpm -e --nodeps nginx ← Nginxだけ削除
warning: /etc/nginx/nginx.conf saved as /etc/nginx/nginx.conf.rpmsave ← rmpが自動で設定ファイルをバックアップ
warning: /etc/nginx/fastcgi_params saved as /etc/nginx/fastcgi_params.rpmsave
# rpm -ivh nginx-1.6.2-1.el6.x86_64.rpm
もし「error: Failed dependencies:」と表示されたら、依存関係を無視してインストールします。
# rpm -ivh --nodeps nginx-1.6.2-1.el6.x86_64.rpm
インストールが完了したら「ngx_cache_purgeモジュール」が正しく組み込まれているか調べます。
# nginx -V

built by gcc 4.4.7 20120313 (Red Hat 4.4.7-11) (GCC)
TLS SNI support enabled
configure arguments: --prefix=/usr/share/nginx --sbin-path=/usr/sbin/nginx --conf-path=/etc/nginx/nginx.conf --error-log-path=/var/log/nginx/error.log --http-log-path=/var/log/nginx/access.log --http-client-body-temp-path=/var/lib/nginx/tmp/client_body --http-proxy-temp-path=/var/lib/nginx/tmp/proxy --http-fastcgi-temp-path=/var/lib/nginx/tmp/fastcgi --http-uwsgi-temp-path=/var/lib/nginx/tmp/uwsgi --http-scgi-temp-path=/var/lib/nginx/tmp/scgi --pid-path=/var/run/nginx.pid --lock-path=/var/lock/subsys/nginx --user=nginx --group=nginx --with-file-aio --with-ipv6 --with-http_ssl_module --with-http_realip_module --with-http_addition_module --with-http_xslt_module --with-http_image_filter_module --with-http_geoip_module --with-http_sub_module --with-http_dav_module --with-http_flv_module --with-http_mp4_module --with-http_gzip_static_module --with-http_random_index_module --with-http_secure_link_module --with-http_degradation_module --with-http_stub_status_module --with-http_perl_module --with-mail --with-mail_ssl_module --with-debug --with-cc-opt='-O2 -g -pipe -Wall -Wp,-D_FORTIFY_SOURCE=2 -fexceptions -fstack-protector --param=ssp-buffer-size=4 -m64 -mtune=generic' --add-module=/home/hoge/rpmbuild/BUILD/nginx-1.6.2/ngx_cache_purge-2.3 --with-ld-opt=-Wl,-E
「--add-module=/home/hoge/rpmbuild/BUILD/nginx-1.6.2/ngx_cache_purge-2.3」となっており、正しくモジュールが追加されていることがわかります。(hogeはコンパイルしたユーザー名)
このモジュールを指定するために展開したファイルを削除しない設定を追加したというわけです。
インストールが完了したら、保存しておいた設定ファイルの復元と、実行ユーザーを変更している場合は「/var/lib/nginx」や「/var/log/nginx」の所有権の変更をして、再起動します。
以上Nginx 1.6.2にngx_cache_purge 2.3を組み込んでインストールする方法でした。
パッチのくだりなど、何のためのパッチなのかを理解せずに行っていると、思わぬエラーで躓くことがあるぞ、という例でした。
 ビックデータ時代のログ収集管理ツールFluentdのインストールと使い方
 fluentdとNorikraでDoS攻撃を遮断し、メールで通知する方法
 Nginxで特定の国のIPだけを許可する方法
 td-agent2へアップデートする方法と、Dstat pluginが動作しない場合の対処法
 Nginxでkeys zoneが足りなくなった場合の対処法
 fluentdのFilter Pluginsを使ってイベントを自在に操る方法
 Nginxとリバースプロキシ、php-fpmとOPcacheのインストールと設定


お世話になります。
http://oxynotes.com/?p=8438 で何度か質問させていただいたbaronです。
この度、アクセス増加に伴い、上位プランに変更のため再度Nginxサーバーを構築することになりました。
以前も、このページを参考にngx_cache_purgeを組み込んでNginx1.6.2をインストールしており
今回も、同じようにコンパイルしたのですが
最後のインストール段階で、
error: open of nginx-1.6.2-1.el6.x86_64.rpm failed: No such file or directory
のエラーが出てしまいます。
こちらのページに記載されている通り
+ umask 022
+ cd /home/www/rpmbuild/BUILD
+ cd nginx-1.6.2
+ /bin/rm -rf /home/www/rpmbuild/BUILDROOT/nginx-1.6.2-1.el6.x86_64
+ exit 0
とコンパイルまでは出来ているのですが…
findで検索すると
/home/www/rpmbuild/RPMS/x86_64/nginx-1.6.2-1.el6.x86_64.rpmは存在しております。
どうしたらインストールできるのでしょうか?
アクセスの増加おめでとうございます。
質問の件ですが、一般のrpmコマンドはWeb上のファイルを取得してインストールしています。
今回はrpmファイルを自前でコンパイルしたため、ファイルがどこにあるか指定する必要があります。そのため、rpmが存在するディレクトリで実行するか、フルパスで指定してインストールしてください。
ありがとうございます。
無事インストールすることが出来ました。
それで、ひとつ質問なのですが
WordPressのサイトを運営するにあたってNginxとApacheでは
サーバーに掛かる負荷はどの程度変わるものなのでしょうか?
GMOCloudVPSのマイクロプランでしたら
Apacheの場合、CloudflareなどのCDNサービスを利用しても
1日 UU 12000 PV 20000 くらいになるとデータベース接続エラーが頻発しておりました。
ですが、今回Nginxで構築したサーバーでは
1日 UU 24000 PV 45000 CDNサービスなしでもデータベース接続エラーは一度も起きませんでした。
現在は、
1日 UU 37000 PV 62000 CDNサービス利用でデータベース接続エラーは起きておりません。
将来的に、まだサイトの規模を大きくしていく予定なのと
GMOから通信量を下げるように連絡がありましたので
上位プランへ変更することにしました。
今回、メモリーが6GBのプラン(ミドルプラン)を契約したのですが
どの程度のアクセスまで耐えられるものなのでしょうか?
無事インストールできたようで安心しました。
ご質問の件ですが、率直に言うと、環境によるとしか言えません。
意外に思われるかもしれませんが、高度にチューニングされたApacheはNginxと遜色ない性能を出します。
通常、Webサーバにどれだけ負荷を掛けてもデータベース接続エラーは起きません。
おそらくデータベース側の同時接続数の限界を迎えたのだと思いますが、これはメモリの割り当てによって変動します。
Nginxはリバースプロキシを使うため、データベースへアクセスすることが無くなるという点と、そもそもApacheに比べて少ないメモリで動作する点で、Apacheより有利な結果になったのだと思います。
サーバのボトルネックがどこにあるかを判断して、改善するのはなかなか骨の折れる作業ですが、設定次第で何倍何十倍のアクセスをさばけるようになるので、試す価値はあると思います。
なるほど
それでは、http://oxynotes.com/?p=8457 にありましたMySQLのチューニングの部分も大事だったのですね。
ApacheでWordPressを運用しているサーバーは私が構築したサーバーではないので
MySQLの設定がどうなっているのかわからないのですが
アクセスが上がってくると、データベース接続エラーが頻発するようになり
その度に、上位のプランへ移行をしておりました。
muninで監視してると
こちらで教えて頂いた構成で構築したサーバーでは
2GBのプランでもまだ余裕がありそうです。
ちなみに今回は6GBのプランで構築中なのですが
MySQLのチューニング部分は同じ設定でも問題ないのでしょうか?
MySQLのチューニングですが、これも環境によるとしか言えません。
どんなソフトを使うのかわからないPCの適切なメモリ量がわからないのと同じです。
環境に合わせて調整するしかありません。
MySQLのチューニングは非常に奥の深い世界です。
ご自身で調整される場合は書籍で体系的に学ぶことをお勧めします。
おすすめは漢(オトコ)のコンピュータ道で有名な奥野さんの「MySQL[運用+管理]トラブルシューティングガイド」です。