無料でHTTPS化できるLet’s Encryptの使い方を1から解説します
Let’s Encrypt(レッツ・エンクリプト)とはTLSやHTTPSによるセキュリティに配慮した通信を広めることを目的としたプロジェクトです。
プロジェクトが正式に開始したのは2016年4月と、まだ新しい試みながら、モジラ財団など大手がスポンサーに付いています。
日本でもサーバホスティングの大手である「さくらインターネット」や「GMO」でも無料SSL化の際に利用したり、ブックマークサービスで有名な「はてな」が今年の6月4日に支援を表明するなど、広がりをみせています。
Let’s Encryptの特徴はなんと言っても無料で暗号化通信に必要な証明書を利用できることです。
認証局で有名なシマンテックやコモドといった会社では1年間で数万~数十万円かかります。
無料だからといって、Let’s Encryptで発行される証明書と、シマンテック等の有料の認証局で発行される証明書にセキュリティ上の違いはありません。
どちらも有効な証明書として機能します。
Let’s Encryptは無料で誰でも利用できます。それは裏を返せば悪意あるサイトも利用できるということです。そのため、信頼性の担保という意味ではあまり役に立ちません。
銀行口座やクレジットカードの情報を扱うなど、高度なセキュリティが必要なサイトの場合は、今まで通り有料の証明書を利用する必要があります。
また、Let’s Encryptの証明書は有効期限が3ヶ月と短いのも特徴です。(ただし後述する自動化を行えば半永久的に自動で更新することが可能)
ということで、Let’s Encryptによるhttps化についてまとめると以下のようになります。
- 無料でサイトをhttps化することができる
- セキュリティの向上という点では有用
- ただし証明書の信頼性は低い
- 利用するには専門知識が必要(レンタルサーバ等ではワンクリックで利用できる場合もある)
Let’s Encryptを導入して証明書を発行する方法
Let’s Encryptには「Certbot クライアント」というコマンドがあります。
「Certbot クライアント」を利用すれば証明書の発行から、自動更新まで細かく制御することができます。
今回はCentOS 6に導入する方法を解説します。
ディストリビューションによって細かな違いはあるものの、Let’s Encrypt公式の解説で詳しく説明しているので迷うことは少ないと思います。
EPELリポジトリの導入
# yum install epel-release
EPELリポジトリは、すでに導入しているという方も多いと思います。
ただしprioritiesで優先順位をつけている場合は注意が必要です。Certbotの導入にはEPELリポジトリの設定が有効である必要があります。「--enablerepo=epel」といったオプションを付けても失敗します。
無効にしている場合は以下のように有効にしておいてください。
# vi /etc/yum.repos.d/epel.repo
[epel]セクションのenabled=0を1へ変更。
Certbotクライアントの導入
EPELリポジトリを導入して有効にしたらCertbotクライアントをインストールします。
後で管理が面倒になるので、root権限でhomeディレクトリで実行してください。
# su -
# wget https://dl.eff.org/certbot-auto
実行権限を付与。以下のように表示されればOKです。
# chmod a+x certbot-auto
# ls -al
-rwxr-xr-x  1 root root       62854 May  3 04:25 certbot-auto
導入が完了したら「certbot-auto」を実行。
この方法で導入された「Certbotクライアント」はcertbotではなくcertbot-autoと入力します。公式の解説も適宜読み替えてください。
# ./certbot-auto

(省略)

Dependencies Resolved

================================================================================
 Package                Arch       Version                    Repository   Size
================================================================================
Installing:
 augeas-libs            x86_64     1.0.0-10.el6               base        314 k
 libffi-devel           x86_64     3.0.5-3.2.el6              base         18 k
 python34               x86_64     3.4.5-4.el6                epel         50 k
 python34-devel         x86_64     3.4.5-4.el6                epel        186 k
 python34-tools         x86_64     3.4.5-4.el6                epel        425 k
Updating:
 ca-certificates        noarch     2017.2.14-65.0.1.el6_9     updates     1.3 M
 gcc                    x86_64     4.4.7-18.el6_9.2           updates      10 M
 redhat-rpm-config      noarch     9.0.3-51.el6.centos        base         60 k
Installing for dependencies:
 python-rpm-macros      noarch     3-11.el6                   epel        5.4 k
 python-srpm-macros     noarch     3-11.el6                   epel        4.8 k
 python3-rpm-macros     noarch     3-11.el6                   epel        4.9 k
 python34-libs          x86_64     3.4.5-4.el6                epel        8.3 M
 python34-tkinter       x86_64     3.4.5-4.el6                epel        336 k
 tcl                    x86_64     1:8.5.7-6.el6              base        1.9 M
 tk                     x86_64     1:8.5.7-5.el6              base        1.4 M
Updating for dependencies:
 cpp                    x86_64     4.4.7-18.el6_9.2           updates     3.7 M
 gcc-c++                x86_64     4.4.7-18.el6_9.2           updates     4.7 M
 gcc-gfortran           x86_64     4.4.7-18.el6_9.2           updates     4.7 M
 libgcc                 x86_64     4.4.7-18.el6_9.2           updates     103 k
 libgfortran            x86_64     4.4.7-18.el6_9.2           updates     268 k
 libgomp                x86_64     4.4.7-18.el6_9.2           updates     134 k
 libstdc++              x86_64     4.4.7-18.el6_9.2           updates     296 k
 libstdc++-devel        x86_64     4.4.7-18.el6_9.2           updates     1.6 M

Transaction Summary
================================================================================
Install      12 Package(s)
Upgrade      11 Package(s)

Total download size: 40 M
Is this ok [y/N]: y ← Yes Noを聞かれるので、yでエンター。
yでエンターしてメールアドレスを聞かれるので登録。
Enter email address (used for urgent renewal and security notices) (Enter 'c' to
cancel): hoge@example.com ← メールアドレスを入力してエンター。
利用規約(pdf)を読んで同意するかどうかを聞かれるのでaを押してエンター。
-------------------------------------------------------------------------------
Please read the Terms of Service at
https://letsencrypt.org/documents/LE-SA-v1.2-November-15-2017.pdf. You must
agree in order to register with the ACME server at
https://acme-v01.api.letsencrypt.org/directory
-------------------------------------------------------------------------------
(A)gree/(C)ancel: a ← aを押してエンター。
電子フロンティア財団にメールアドレスを登録するかを聞かれるので好きな方を選んでエンター。
-------------------------------------------------------------------------------
Would you be willing to share your email address with the Electronic Frontier
Foundation, a founding partner of the Let's Encrypt project and the non-profit
organization that develops Certbot? We'd like to send you email about EFF and
our work to encrypt the web, protect its users and defend digital rights.
-------------------------------------------------------------------------------
(Y)es/(N)o: y ← yを押してエンター。
https化をするドメインを聞いてきます。そのままエンターを実行するとすべてのドメインで証明書の発行を行います。
ただし、この時点ですんなりと導入できることはまれなので、キャンセルのcを入力してエンターで良いと思います。
Which names would you like to activate HTTPS for?
-------------------------------------------------------------------------------
1: aqwiki.net
2: go-iken.net
3: oxynotes.com
4: sukegra.com
-------------------------------------------------------------------------------
Select the appropriate numbers separated by commas and/or spaces, or leave input
blank to select all options shown (Enter 'c' to cancel): c ← cを押してエンター。
以下失敗した場合のサンプル
Waiting for verification...
Cleaning up challenges
Failed authorization procedure. go-iken.net (http-01): urn:acme:error:unauthorized :: The client lacks sufficient authorization :: Invalid response from http://go-iken.net/.well-known/acme-challenge/hnajJtKsg0y6VlAguTH4vkVHvACiNXwXhtgzZd_tMzw: "<!DOCTYPE HTML PUBLIC "-//W3C//DTD HTML 4.01 Transitional//EN">
<html>
<head>
<meta http-equiv="content-style-type" content="", aqwiki.net (http-01): urn:acme:error:unauthorized :: The client lacks sufficient authorization :: Invalid response from http://aqwiki.net/.well-known/acme-challenge/yXe0go9V81n1uUs_EQ-S43EPIzMq3Mo7-HC1ZWsWVRE: "<!DOCTYPE HTML PUBLIC "-//W3C//DTD HTML 4.01 Transitional//EN">
<html>
<head>
<meta http-equiv="content-style-type" content="tex"

IMPORTANT NOTES:
 - The following errors were reported by the server:

   Domain: go-iken.net
   Type:   unauthorized
   Detail: Invalid response from
   http://go-iken.net/.well-known/acme-challenge/hnajJtKsg0y6VlAguTH4vkVHvACiNXwXhtgzZd_tMzw:
   "<!DOCTYPE HTML PUBLIC "-//W3C//DTD HTML 4.01 Transitional//EN">
   <html>
   <head>
   <meta http-equiv="content-style-type" content=""

   Domain: aqwiki.net
   Type:   unauthorized
   Detail: Invalid response from
   http://aqwiki.net/.well-known/acme-challenge/yXe0go9V81n1uUs_EQ-S43EPIzMq3Mo7-HC1ZWsWVRE:
   "<!DOCTYPE HTML PUBLIC "-//W3C//DTD HTML 4.01 Transitional//EN">
   <html>
   <head>
   <meta http-equiv="content-style-type" content="tex"

   To fix these errors, please make sure that your domain name was
   entered correctly and the DNS A/AAAA record(s) for that domain
   contain(s) the right IP address.
 - Your account credentials have been saved in your Certbot
   configuration directory at /etc/letsencrypt. You should make a
   secure backup of this folder now. This configuration directory will
   also contain certificates and private keys obtained by Certbot so
   making regular backups of this folder is ideal.
Certbotクライアントの使い方を解説
基本的なコマンドは公式のコマンド解説ページにまとまっています。
このページでは実際の証明書の発行と自動化の際に利用するコマンドに限定して解説します。
certonly
Webサーバを停止することなくSSL/TLSサーバ証明書を取得します。
証明書のインストール(サーバソフトウェアの設定)は行われません。ここで言うサーバソフトウエアとはApacheやNginxのことです。
installというサブコマンドを利用するか、より具体的に--apacheや--nginxといったプラグインオプションを指定すると自動でWebサーバの設定を更新することが可能です。
余談ですが、証明書の発行にはstandaloneというコマンドも用意されています。
standaloneは読んで字のごとく、Webサーバが動作していないサーバでもコマンド単体で証明書の発行が可能なコマンドです。
利用時にポート80と443を利用するため、ApacheやNginxでポートをバインドしている場合は利用できません。そのためWebサーバを導入しているサーバで実行する場合は、1度Webサーバを停止する必要があります。後述する自動更新とも相性が悪いため、Webサーバでhttps化を行う際は利用しません。
--webroot
このプラグインオプションでドメインに対応するドキュメントルートを指定します。
Certbotクライアントでは、このオプションで指定したパスへ確認用のファイルを一時的に書き込むことで、サーバの所有権を確認します。
確認ファイルを書き込む場所の例
/var/www/html/example/.well-known/acme-challenge/test
具体的なディレクトリの指定は「-w」オプションの後に追記します。
-wの記述方法サンプル
--webroot -w /var/www/html/example/
続いて「-d」オプションでドメインを指定します。(--domainでもOK)
-dの記述方法サンプル
-d example.com
上記のオプションを組み合わせると以下のようなコマンドになります。
# ./certbot-auto certonly --webroot -w /var/www/html/example/ -d example.com
これでCertbotクライアントによって証明書が発行されます。
正しく証明書が発行されれば以下のようにログが流れます。
Saving debug log to /var/log/letsencrypt/letsencrypt.log
Plugins selected: Authenticator webroot, Installer None
Obtaining a new certificate
Performing the following challenges:
http-01 challenge for example.com
Using the webroot path /var/www/html/example for all unmatched domains.
Waiting for verification...
Cleaning up challenges

IMPORTANT NOTES:
 - Congratulations! Your certificate and chain have been saved at:
   /etc/letsencrypt/live/example.com/fullchain.pem
   Your key file has been saved at:
   /etc/letsencrypt/live/example.com/privkey.pem
   Your cert will expire on 2018-09-03. To obtain a new or tweaked
   version of this certificate in the future, simply run certbot-auto
   again. To non-interactively renew *all* of your certificates, run
   "certbot-auto renew"
 - If you like Certbot, please consider supporting our work by:

   Donating to ISRG / Let's Encrypt:   https://letsencrypt.org/donate
   Donating to EFF:                    https://eff.org/donate-le
logにもある通り、証明書などのファイルは「/etc/letsencrypt/live/example.com/」に保存されています。
具体的にはNginxのssl_certificateで使う証明書は「/etc/letsencrypt/live/example.com/fullchain.pem」。
キーファイルは「/etc/letsencrypt/live/example.com/privkey.pem」に保存されています。
証明書を自動で更新する方法
証明書が発行できたら自動更新を設定します。
Let’s Encryptの証明書は有効期限が3ヶ月と短いのが特徴です。
複数のサイトを運営している場合、何度も取得するのは手間です。そこで、cronを利用して自動で証明書を更新します。
実はLet’s Encryptには自動更新用のコマンドが用意されています。
自動化の方法はさまざまありますが、このページではcrontabに新しいルールを追記する方法をとります。
# vi /etc/crontab
以下の行を追記してください。
0 5 * * * root /root/certbot-auto renew --post-hook "service nginx restart"
rootユーザーで毎日5時に「./certbot-auto renew –post-hook “service nginx restart”」というコマンドを実行するという設定です。
crontabについて詳しく知りたい方は過去の投稿をご覧ください。
「renew」というコマンドがメインの部分です。
renewコマンドを利用すると証明書の有効期限が30日以内の場合、新しい証明書を発行してくれます。
更新のタイミングは30日あるので、毎日ではなく1周間に1度程度でも良いと思います。その場合は以下のように曜日のフィールドを指定します。(0は日曜日)
0 5 * * 0 root /root/certbot-auto renew --post-hook "service nginx restart"
「--post-hook」というオプションは、証明書を再発行した場合のみ、続くコマンドを実行します。
そのため、「service nginx restart」の部分は証明書が再発行されない限り実行されません。
具体的には「No hooks were run.」というログが流れ、処理が停止します。
ちなみに正しく更新されると以下のようなログが流れます。
- - - - - - - - - - - - - - - - - - - - - - - - - - - - - - - - - - - - - - - -
Processing /etc/letsencrypt/renewal/oxynotes.com.conf
- - - - - - - - - - - - - - - - - - - - - - - - - - - - - - - - - - - - - - - -
Cert is due for renewal, auto-renewing...
Plugins selected: Authenticator webroot, Installer None
Renewing an existing certificate
Performing the following challenges:
http-01 challenge for oxynotes.com
Waiting for verification...
Cleaning up challenges

- - - - - - - - - - - - - - - - - - - - - - - - - - - - - - - - - - - - - - - -
new certificate deployed without reload, fullchain is
/etc/letsencrypt/live/oxynotes.com/fullchain.pem
- - - - - - - - - - - - - - - - - - - - - - - - - - - - - - - - - - - - - - - -

- - - - - - - - - - - - - - - - - - - - - - - - - - - - - - - - - - - - - - - -

Congratulations, all renewals succeeded. The following certs have been renewed:
  /etc/letsencrypt/live/oxynotes.com/fullchain.pem (success)
- - - - - - - - - - - - - - - - - - - - - - - - - - - - - - - - - - - - - - - -
更新がまだ必要ない場合は以下のログ
- - - - - - - - - - - - - - - - - - - - - - - - - - - - - - - - - - - - - - - -
Processing /etc/letsencrypt/renewal/oxynotes.com.conf
- - - - - - - - - - - - - - - - - - - - - - - - - - - - - - - - - - - - - - - -
Cert not yet due for renewal
サーバ証明書の発行が失敗する場合の対処法
証明書の発行は様々な理由で失敗する場合があります。
原因と対処法を解説します。
失敗した場合のログ
   Domain: go-iken.net
   Type:   unauthorized
   Detail: Invalid response from
   http://go-iken.net/.well-known/acme-challenge/hnajJtKsg0y6VlAguTH4vkVHvACiNXwXhtgzZd_tMzw:
   "<!DOCTYPE HTML PUBLIC "-//W3C//DTD HTML 4.01 Transitional//EN">
   <html>
   <head>
   <meta http-equiv="content-style-type" content=""

   Domain: aqwiki.net
   Type:   unauthorized
   Detail: Invalid response from
   http://aqwiki.net/.well-known/acme-challenge/yXe0go9V81n1uUs_EQ-S43EPIzMq3Mo7-HC1ZWsWVRE:
   "<!DOCTYPE HTML PUBLIC "-//W3C//DTD HTML 4.01 Transitional//EN">
   <html>
   <head>
   <meta http-equiv="content-style-type" content="tex"

   To fix these errors, please make sure that your domain name was
   entered correctly and the DNS A/AAAA record(s) for that domain
   contain(s) the right IP address.
 - Your account credentials have been saved in your Certbot
   configuration directory at /etc/letsencrypt. You should make a
   secure backup of this folder now. This configuration directory will
   also contain certificates and private keys obtained by Certbot so
   making regular backups of this folder is ideal.
このような失敗をする場合、以下の点を確認してみてください。
1.DNSでAレコードが正しく設定されているか。(ドメイン名を入力して正しく)
nslookupでAレコードとドメインの値が正しく反映されているか確認してみてください。
1.iptablesなど、ファイアーウォールでポート80と443が閉じていないか。
証明書の発行時にポート80と443を利用するので、ポートが空いているか確認してください。もしくはSSH用のポートを日本以外のIPからアクセス禁止等の処置をしていないか確認。
1.-wオプションで指定しているルートディレクトリにアクセスできるか。
「.」で始まるファイルやフォルダへのアクセスを禁止していないか。
テストするには以下のコマンドを試してみてください。
-wオプションで指定するパスが「/var/www/html/example/」でサイトのドメインが「example.com」の場合
# mkdir -p /var/www/html/example/.well-known/acme-challenge/
# echo -n "Testing webroot acme challenge" > /var/www/html/example/.well-known/acme-challenge/test
コマンドを実行したら「http://example.com/.well-known/acme-challenge/test」へアクセス。
これで403エラーや500エラーが出る場合はWebサーバの設定を見直す必要があります。
私の場合はWordPressの設定を行う際に読み込んでいた以下の設定が悪さをしていました。
include global/restrictions.conf;
具体的にはrestrictions.confにある以下の記述をコメントアウトすることで動作しました。
# vi /etc/nginx/global/restrictions.conf
location ~ /\. {
	deny all;
}
これは「.」で始まるファイルやフォルダへのアクセスを禁止する設定です。Apatchで利用される隠し設定ファイルへのアクセスを禁止するものです。Nginxの場合は通常利用していないため、コメントアウトしても構いません。
もしくは以下のように所有権の確認に使うディレクトリだけ有効にして、それ以外を無効にします。
location ~ /\.well-known/ {
	allow all;
}
location ~ /\. {
	deny all;
}
NginxでHTTPS化するために設定する
Nginxでドメインが「example.com」、ドキュメントルートが「/var/www/html/example」の場合のサンプルです。
serverディレクティブでポート80をバインドしている場合です。
# vi /etc/nginx/nginx.conf
以下のような設定になっているものを
server{
	listen       80 default_server; # デフォルトサーバに指定
	server_name  example.com;

	root   /var/www/html/example; # ドキュメントルート
	index  index.html index.htm index.php; # indexの設定

	access_log  /var/log/nginx/example.com_access.log  main;
	error_log   /var/log/nginx/example.com_error.log warn;
(省略)
以下のように変更します。
server{
	listen       443 ssl default_server; # デフォルトサーバに指定
	server_name  example.com;

	ssl_certificate         /etc/letsencrypt/live/example.com/cert.pem;
	ssl_certificate_key     /etc/letsencrypt/live/example.com/privkey.pem;

	root   /var/www/html/example; # ドキュメントルート
	index  index.html index.htm index.php; # indexの設定

	access_log  /var/log/nginx/example.com_access.log  main;
	error_log   /var/log/nginx/example.com_error.log warn;
(省略)
listenでポートを443、SSL通信を指定。
ssl_certificateとssl_certificate_keyで証明書とキーを指定します。ここのパスを変更するとcronで自動更新された証明書と整合性が取れなくなるので注意してください。
アクセスログなどは、分けなくても良いですが、切り替えたほうがベターです。
正しく設定できたらWebサーバを再起動してください。
# service nginx restart
WordPressの設定を変更する
まずは変更する前にテーマファイルとデータベースのバックアップを行ってください。
wp-config.phpの編集
WordPressのルートディレクトリにある「wp-config.php」を編集して、以下を追記します。
$_SERVER['HTTPS'] = 'on';
$_ENV['HTTPS'] = 'on';
この編集を加えないとログイン画面などでリダイレクトループになります。
管理画面でWordPress アドレスを編集する
管理画面で「設定 > 一般設定」でWordPress アドレス (URL)とサイトアドレス (URL)を編集します。

読み込んでいるファイルのパスを編集する
テーマファイルでjQueryなどjavaScriptファイルを読み込んでいる場合はスキームをhttp://ではなくhttps://に変更してください。
jQueryなどのパスがhttp://のままだと正しく動作しません。
他にもCSSで画像等を読み込んでいる場合もhttps://へ変更してください。
ちなみにスキームの指定は省略しても動作します。たとえば以下のような指定をする場合、
http://example.com/hoge.js
https://example.com/hoge.js
スキームを省略して以下のように記述することもできます。このように書いておくことでhttpでもhttpsでもどちらも対応することができます。
//example.com/hoge.js
そもそも、相対パスで書けるところは相対パスで記述しておくほうがおすすめです。
Search Regexで投稿の内容を一括置換する
投稿の内容に関しては手動ですべて置き換えるというのは現実的ではありません。
WordPressのプラグインで正規表現で置き換えを行うことのできるSearch Regexを利用して一括で置換を行います。
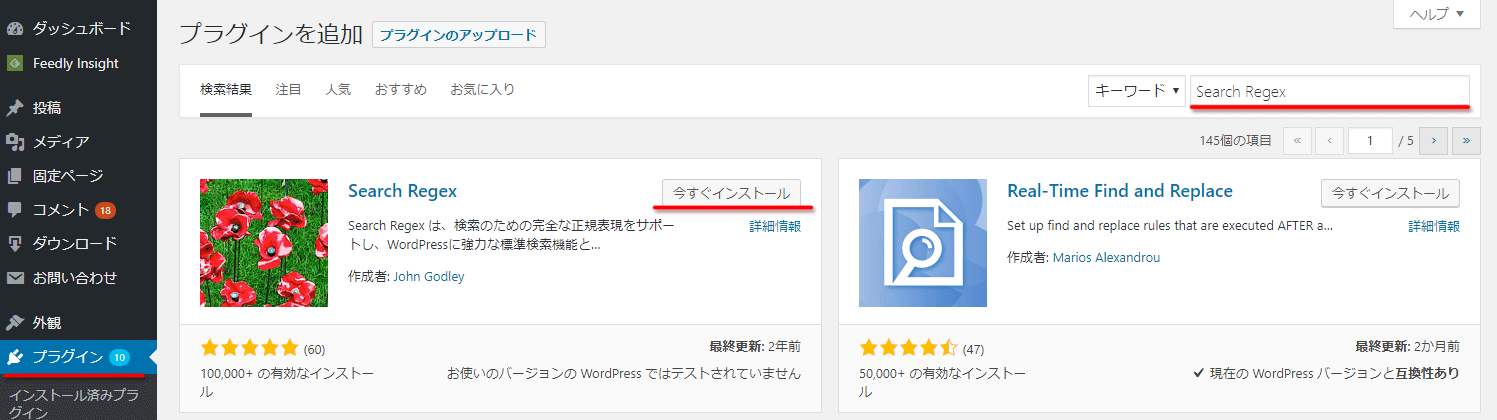
WordPressの管理画面から「プラグイン > 新規追加」で検索ボックスに「Search Regex」と入力してインストールしてください。
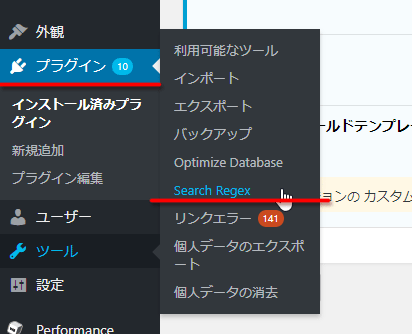
有効化したら「プラグイン > Search Regex」と進みます。
Search patternに検索する文字列、Replace patternに置き換える文字列を指定します。
「Search」ボタンをクリックすれば置き換える文字が何回ヒットしたかカウントしてくれます。(この時点ではまだ置き換えられません)
この処理は重いので処理する文字数が多い場合や、低速なサーバ等の場合は「Limit to」で一度に置き換える文字数を制限したほうが良いかもしれません。
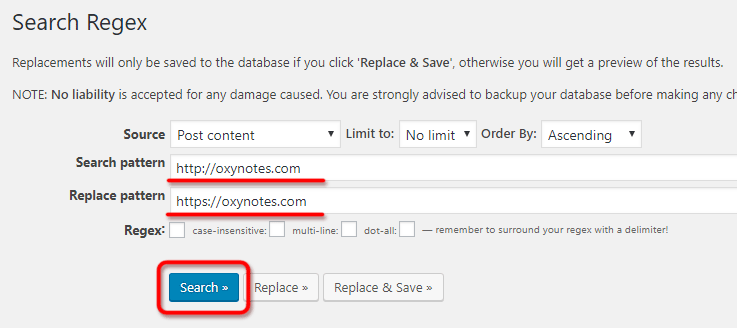
以下のように項目が表示されるので、確認してください。
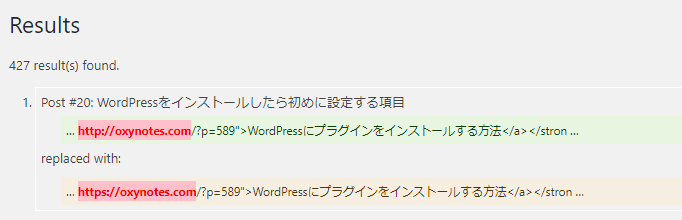
良いようなら「Replace & Save」ボタンをクリックして置き換えます。
(上にも書きましたが置き換えを行う前にデータベースのバックアップを取ることを強くお勧めします)
以上でLet’s EncryptでWordPressのサイトをhttps化することができました。
Let’s Encryptの導入は「誰でも簡単に利用できる」とは言えないものの、自分でサーバを構築できる人にとっては比較的容易だと思います。
このようなサービスが広まることでインターネットが安心安全に利用できるようになるのは、ありがたい限りです。